Automate Crypto Trading with a Python-Powered Twitter Bot and Gate.io Signals

This tutorial develops a Twitter bot in Python that will generate automated trading signals. The bot will pull real-time price data on various cryptocurrencies (Bitcoin, Ethereum, Doge, etc.) from the crypto exchange Gate.io and analyze it using predefined rules. Whenever the bot detects a relevant price change, it automatically posts a tweet via Twitter. Simple Twitter bots can proactively inform their audiences about relevant events in the market. Such an event can be a sharp rise or fall in price or a sudden spike in the trading volume. If we examine data for specific price movements, we can also store these events and use them later to train a predictive model.
More advanced signal bots use predictive models to signal when it is appropriate to enter or exit the market. Or the bot executes the buy- and sell-orders directly itself. A well-defined signaling logic can therefore constitute the first step toward algorithmic trading. But one thing at a time. So in this article, we will begin by developing a simple signal bot.
The rest of this article is structured as follows. First, we take a look at the different code modules of the Twitter bot. After that, we’ll implement the other code modules in Python. Finally, we will integrate the modules and run some tests. We will also quickly introduce the APIs used to build the bot.

Bots can do a lot of cool things but should be used with caution. Image created with Midjourney
Different Modules of the Signal Bot
This section briefly describes the conceptual architecture of the Crypto Twitter bot. Its architecture adheres to a modular design pattern and separates into four loosely coupled modules. Each module has a clear function.
- The Data Collection Module retrieves price data from the crypto exchange Gate.io. The module sends requests at regular intervals against the gate.io API. The module adds the data to separate data stores - one for each cryptocurrency. It then forwards the data to the preprocessing module.
- The Data Preprocessing Module calculates the statistical indicators, such as moving averages or means, which become the basis for the signaling logic.
- The Signaling Module searches for relevant events based on the indicator values provided. If a relevant event is detected, it is reported to the communication module.
- The Communication Module connects to the Twitter API. As soon as it is informed about a new event, it tweets about this event on Twitter.
Now that you are familiar with the modules of our Crypto Twitter Bot, we can take a look at its underlying APIs.
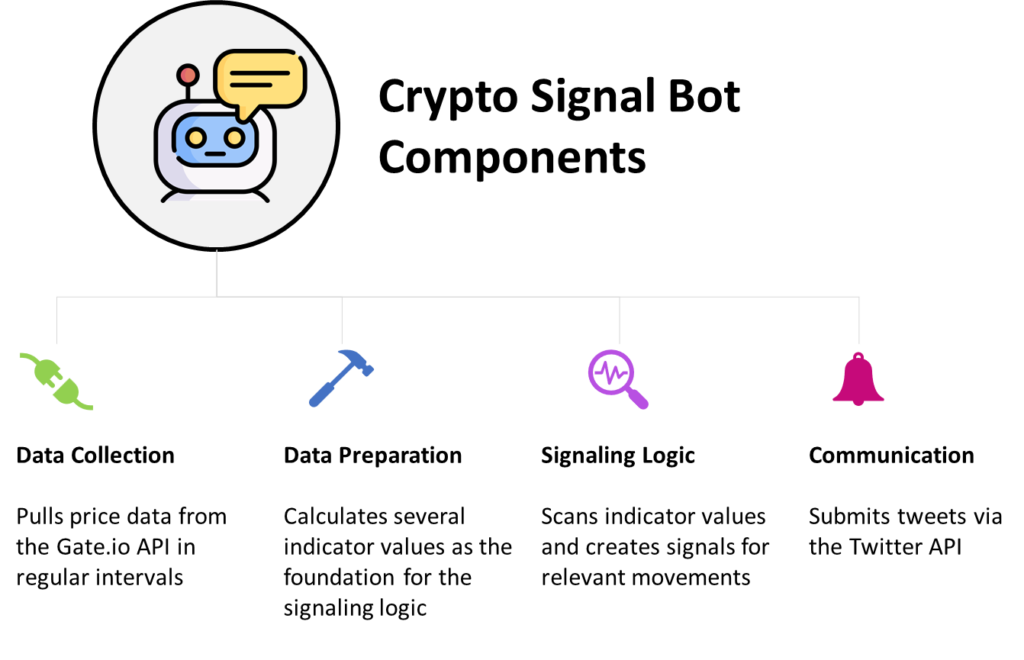
Components of the Relataly Crypto Signal Bot
About the APIs Used in this Tutorial
In this tutorial, we will be using two APIs:
- The Gate.io API to fetch price data.
- Twitter to post Tweets about Trading Signals
The Gate.io API
Firstly, we will be using the Gate.io API to obtain prices for various cryptocurrencies. Gate.io is one of the smaller crypto exchanges in the crypto-verse. However, it offers a wide range of smaller cryptocurrencies, especially those you cannot trade anywhere else. As of now, the gate.io market endpoint does not require authentication to use its essential functions.
Check out our recent relataly gate.io tutorial to learn how to pull data via the gate.io API in Python.
The Twitter API
The second API that our bot will use is the Twitter API. We will use this API via the Python package Tweepy to post crypto price signals. Check out this article if you are looking for a simple code example of submitting tweets via the Twitter API. If you don’t want to use Twitter, you can disable its use in the code.
Posting tweets via the API requires authentication with a valid developer account. You can apply for a developer account for free on the Twitter developer website. Just be aware that the confirmation can sometimes take several days.
Storing the Twitter API Key
Storing API keys in your code can compromise the security of your application. If the code is made public, for example, by publishing it on a code-sharing website like GitHub, anyone who has access to the code can use the API key to make requests to the API and potentially access sensitive information or cause harm to your account or application. A better practice is to import and access the API key from a separate YAML file, from where you can import it into your project. To store the Twitter API Key, create a YAML file with the name “api_config_twitter.yml” and insert your API key into this file as follows:
api_key: “your api key”
Implementing a Twitter Signal Bot using Python
In this article, we will walk through the process of creating a Twitter bot that automatically tweets updates about cryptocurrency prices. The bot will be designed to pull real-time data on cryptocurrency prices from an external API, and then automatically generate and post tweets on a regular basis. By the end of the article, you will have a fully functional Twitter bot that can keep your followers informed about the latest cryptocurrency prices.
Note: You require a Twitter developer account if you want to use the Twitter functionality. Without an account, you can still print out trading signals to yourself, but you will not be able to post them via the Twitter API.
The code is available on the GitHub repository.
Disclaimer: This article does not constitute financial advice. Stock markets can be very volatile and are generally difficult to predict. Predictive models and other forms of analytics applied in this article only illustrate machine learning use cases.
Python Prerequisites
Before starting the coding part, make sure that you have set up your Python 3 environment and required packages. If you don’t have an environment set up yet, you can follow this tutorial to set up the Anaconda environment.
Also, make sure you install all required packages. In this tutorial, we will be working with the following standard packages:
In addition, we will use the following two packages:
- Firstly, the gate.io package (package name gate-API) pulls crypto price data from gate.io.
- Secondly, we will use the Twitter API library Tweepy to post trading signals via the Twitter API.
You can install packages using console commands:
- pip install
- conda install
(if you are using the anaconda packet manager)
Step #1: Regular Retrieval of Price Data
First, we will define a “prices” class to handle the incoming data flow. The prices class contains a “get_latest_prices” attribute that retrieves price information from gate.io. The function regularly calls the gate.io list_ticker market endpoint.
The list_ticker endpoint returns a list of data fields for cryptocurrency pairs. Examples of price pairs are BTC_USD, BTC_ETH, BTC_ADA, etc. We can limit the response to a single price pair by passing a single pair as a variable in the API call. However, it is not possible to restrict the response to multiple pairs. We either get data for a single pair or all pairs. The response contains a list of the following data fields:
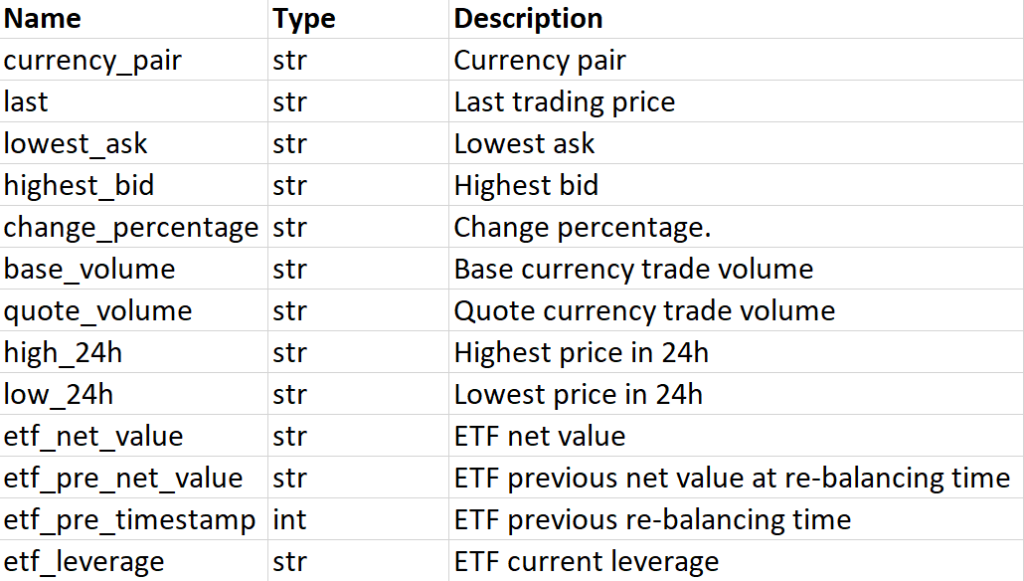
Overview of the data fields in the response
The following code maintains a separate dictionary for each cryptocurrency pair. The dictionary contains the name of the cryptocurrency pair and a data frame that includes the price data history. Each time the crypto bot receives a new response from the API, it goes through the response, extracts the price data(Price, Volume, etc.), and appends this data to the Data Frame of the respective cryptocurrency pair. Then the information is passed to the preprocessing module.
import pandas as pd
import numpy as np
import json
import requests
import datetime as dt
import logging
import threading
import time
from __future__ import print_function

import tweepy
import gate_api
from gate_api.exceptions import ApiException, GateApiException
from twitter_secrets import twitter_secrets as ts # place the twitter_secrets file under <User>/anaconda3/Lib

class Prices:
    """Class that uses the gate api to retrieve currency data."""

    def __init__(self, config):
        self._config = config
        self._logger = logging.getLogger(__name__)
        configuration = gate_api.Configuration(host="https://api.gateio.ws/api/v4")
        api_client = gate_api.ApiClient(configuration)
        self._api_instance = gate_api.SpotApi(api_client)
        self._price_history = {}
        self._cont_update_thread = None
        self._stop_cont_update_thread = None
        self._price_history_lock = threading.Lock()

    def get_price_history(self):
        """Returns a dictionary with the price histories for the currencies."""
        return self._price_history, self._price_history_lock

    def get_latest_prices(self):
        """Gets new price data and adds the values to a DataFrame.

        Returns the DataFrame in a dictionary with the currencies as keys."""
        timestamp = dt.datetime.now()
        try:
            api_response = self._api_instance.list_tickers()
        except GateApiException as e:
            logging.warning(
                "Gate api exception, label: %s, message: %s\n" % (e.label, e.message)
            )
            return {}
        except ApiException as e:
            logging.warning("Exception when calling SpotApi->list_tickers: %s\n" % e)
            return {}
        latest_prices = {}
        for response in api_response:
            currency = response.currency_pair
            if "USDT" not in currency or "BEAR" in currency:
                continue
            value_dict = {
                "base_volume": pd.to_numeric(response.base_volume),
                "change_percentage": pd.to_numeric(response.change_percentage),
                "etf_leverage": pd.to_numeric(response.etf_leverage),
                "etf_net_value": pd.to_numeric(response.etf_net_value),
                "etf_pre_net_value": pd.to_numeric(response.etf_pre_net_value),
                "etf_pre_timestamp": response.etf_pre_timestamp,
                "high_24h": pd.to_numeric(response.high_24h),
                "highest_bid": pd.to_numeric(response.highest_bid),
                "high_bid": pd.to_numeric(response.highest_bid),
                "last": pd.to_numeric(response.last),
                "low_24h": pd.to_numeric(response.low_24h),
                "lowest_ask": pd.to_numeric(response.lowest_ask),
                "quote_volume": pd.to_numeric(response.quote_volume),
                "timestamp": timestamp,
            }
            latest_prices[currency] = pd.DataFrame(value_dict, index=[1])
        return latest_prices

    def start_cont_update(self):
        self._stop_cont_update_thread = threading.Event()
        self._stop_cont_update_thread.clear()
        self._cont_update_thread = threading.Thread(
            target=self._cont_update,
            args=(
                self._stop_cont_update_thread,
                self._price_history_lock,
            ),
        )
        self._cont_update_thread.start()
        self._logger.info("Started continuous price logging")

    def _cont_update(self, stop_event, lock):
        """Continuously adds new prices to the price history."""
        while not stop_event.is_set():
            start_time = time.time()
            lock.acquire()
            for currency, df in self.get_latest_prices().items():
                if currency in self._price_history.keys():
                    self._price_history[currency] = self._price_history[
                        currency
                    ].append(df, ignore_index=True)
                else:
                    self._price_history[currency] = df
            lock.release()
            self._logger.debug("Currency_dfs updated")
            self._wait_before_update(start_time)

    def _wait_before_update(self, start_time):
        elapsed_time = time.time() - start_time
        self._logger.debug(f"Elapsed time: {elapsed_time}")
        if elapsed_time > self._config["price_update_delay"]:
            delay = 0
            self._logger.warning(
                #"It took longer to retrieve the price data than the update_delay!"
            )
        else:
            delay = self._config["price_update_delay"] - elapsed_time
        self._logger.debug(f"Waiting {delay}s until next update")
        time.sleep(delay)
Step #2: Calculate Indicator Values
Next, we will define a few functions that process the regular data inflow from gate.io and calculate indicator values for the different cryptocurrencies.
Absolute price values signal the bot that the price moves up or down. However, our signaling logic will primarily work with thresholds on percentage values. These indicators have a p at the end of the name in the code below.
In addition, we will avoid misleading signals by incorporating moving averages into the signaling logic. Moving averages work on historical data, so we have to hand over the price history when we call the “calc_indicators” function. Furthermore, we take over other indicators from the data frame, including the 24h_low and the 24h_high. These indicators give us additional information about the indicators of the preceding price points. We can use them to build more robust trading signals.
All indicators are calculated separately for each crypto pair, passed to a dictionary, and then passed to the signaling logic. In the next step, we can use these indicator values in our signaling rules.
def calc_indicators(price_history):
    indicators = {}
    indicators_over_all = calc_indicators_over_all(price_history)
    for currency, df in price_history.items():
        if len(df) <= 2:
            logging.getLogger().debug(
                f"Skipped '{currency} when calculating indicators due to a lack of information"
            )
            continue
        volume = df["base_volume"].iloc[-1]
        last_price = df["last"].iloc[-1]
        moving_avg_price = df["last"].mean()
        moving_average_volume = df["base_volume"].mean()
        moving_average_deviation_percent = np.round(
            div(last_price, moving_avg_price) - 1, 2
        )

        price_before = df["last"].iloc[-2]
        price_delta = last_price - price_before
        price_delta_p = div(price_delta, last_price)
        price_delta_before = price_before - df["last"].iloc[-3]
        price_delta_p_before = div((price_before - df["last"].iloc[-3]), price_before)
        low_24h = df["low_24h"].iloc[-1]
        high_24h = df["high_24h"].iloc[-1]
        low_high_diff_p = div(high_24h - low_24h, low_24h)
        change_percentage = df["change_percentage"].iloc[-1]

        indicator_values = {
            "last_price": last_price,
            "price_before": price_before,
            "volume": volume,
            "moving_avg_price": moving_avg_price,
            "moving_average_volume": moving_average_volume,
            "moving_average_deviation_percent": moving_average_deviation_percent,
            "price_delta_p": price_delta_p,
            "price_delta": price_delta,
            "price_delta_before": price_delta_before,
            "price_delta_p_before": price_delta_p_before,
            "high_24h": high_24h,
            "low_24h": low_24h,
            "low_high_diff_p": low_high_diff_p,
            "change_percentage": change_percentage,
        }
        indicator_values.update(indicators_over_all)
        indicators[currency] = indicator_values
    return indicators

def calc_indicators_over_all(price_history):
    avg_change_p = 0
    for currency, df in price_history.items():
        avg_change_p += df["change_percentage"].iloc[-1]
    nr_of_currencies = len(price_history)
    avg_change_p = div(avg_change_p, nr_of_currencies)
    values = {
        "avg_change_p": avg_change_p,
    }
    return values

def div(dividend, divisor, alt_value=0.0):
    return dividend / divisor if divisor != 0 else alt_value
Step #3: Define the Signaling Logic of the Twitter Bot
Our bot will use a signaling logic that differentiates between the following price signals:
- A simple uptick: Price_delta_p must be higher than the threshold (10%) to trigger.
- A simple downtick: Price_delta_p must be lower than the threshold (10%) to trigger.
- The bot does also report on new 24-hour lows and highs
- Another event on which the bot reports is when an up or down price trend begins to accelerate or slows down.
- The bot reports that when a price performs a trend reversal (pullback and recovery)
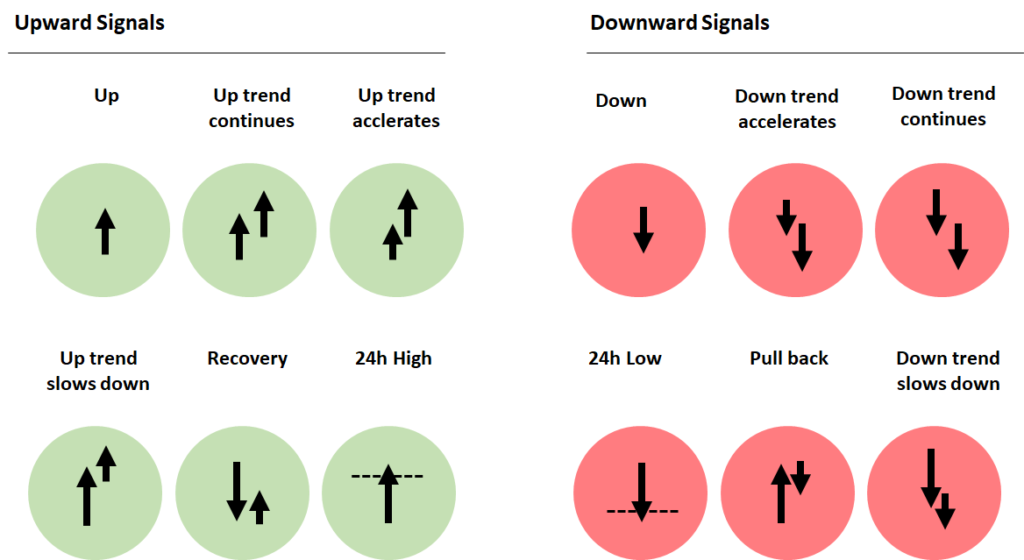
Overview of the different trading signals generated by the signaling logic
Be aware that the price_delta_p measures the percentage deviation from the previous price point. Thus, the signaling logic that our bot has in place is very dependent on the interval in which the bots request new price data. Shorter time intervals will have a lower chance of triggering because more considerable changes typically occur over a longer time. For more details regarding the signaling logic, please view the code below.
def check_signal(currency, indicators, cs_config):
    ind = indicators[currency]
    signal = ''
    if (ind['moving_avg_price'] > 0
            and ind['last_price'] > 0.0
            and abs(ind['price_delta']) > 0.0
            and abs(ind['price_delta_p']) >= cs_config["delta_threshold_p"]
            and ind['volume'] > 0
    ):
        # up
        if ind['price_delta'] > 0:
            movement_type = 'up +'
            if abs(ind['price_delta_p_before']) > cs_config["delta_threshold_p"]:
                if ind['price_delta_before'] <= 0:
                    movement_type = 'recovery from ' + str(ind['price_before']) + ' to ' + str(ind['last_price'])
                else:
                    if ind['price_delta_p'] * (1-cs_config["delta_threshold_p"]) > ind['price_delta_p_before']:
                        movement_type = 'upward trend accelerates +'
                    elif ind['price_delta_p'] < ind['price_delta_p_before'] * (1-cs_config["delta_threshold_p"]):
                        movement_type = 'upward trend slows down +'
                    elif ind['price_delta_p'] * (1+cs_config["delta_threshold_p"]) >= ind['price_delta_p_before'] >= ind['price_delta_p'] * (1-cs_config["delta_threshold_p"]):
                        movement_type = 'upward trend continues +'
        # down
        elif ind['price_delta'] < 0:
            movement_type = 'down '
            if abs(ind['price_delta_p_before']) > cs_config["delta_threshold_p"]:
                if ind['price_delta_before'] > 0:
                    movement_type = 'pullback from ' + str(ind['price_before']) + ' to ' + str(ind['last_price'])
                else:
                    if ind['price_delta_p'] * (1-cs_config["delta_threshold_p"]) > ind['price_delta_p_before']:
                        movement_type = 'down trend accelerates '
                    elif ind['price_delta_p'] * (1+cs_config["delta_threshold_p"]) >= ind['price_delta_p_before'] >= ind['price_delta_p'] * (1-cs_config["delta_threshold_p"]):
                        movement_type = 'down trend continues '
                    elif ind['price_delta_p'] < ind['price_delta_p_before'] * (1+cs_config["delta_threshold_p"]):
                        movement_type = 'downward trend slows down '

        signal = get_signal_log(movement_type, currency, ind['price_delta_p'], ind['last_price'],
                                ind['moving_avg_price'], ind['volume'], ind['price_delta'], ind['change_percentage'],
                                ind['high_24h'], ind['low_24h'], ind['low_high_diff_p'])

        check_24h_peak(currency, ind['last_price'], ind['low_24h'], ind['high_24h'])

    return signal
    # trade_signal

def check_24h_peak(currency, last_price, low_24h, high_24h):
    if last_price < low_24h:
        print(currency + ' new 24h low $' + str(last_price))
    elif last_price > high_24h:
        print(currency + ' new 24h high $' + str(last_price))

def get_signal_log(movement_type, currency, price_delta_p, last_price, moving_avg_price, volume, price_delta,
                   daily_up_p, high_24h, low_24h, low_high_diff_p):
    signal = f'{currency} {movement_type} ' \
             f'{np.round(price_delta_p * 100, 5)}% ' \
             f'MA:${np.round(moving_avg_price, 6)} ' \
             f'last_price:${np.round(last_price, 6)} ' \
             f'price delta:{np.round(price_delta, 6)} ' \
             f'volume:${np.round(volume, 1)} ' \
             f'daily_change:{np.round(daily_up_p, 2)}% ' \
             f'high_24h:${high_24h} ' \
             f'low_24h:${low_24h} ' \
             f'low_high_diff_p:{np.round(low_high_diff_p * 100, 2)}%'
    return signal
Step #4: Send Tweets via Twitter
Next, we define a simple function that calls the Twitter API and tweets our price signal. Because the Twitter API requires authentication, you must provide the API authentication credentials from a valid Twitter developer account.
It’s best not to store the API credentials directly in code. Still not perfect, but slightly better is to keep the data in a separate python file (for example, called “twitter_secrets”) that you put into your package folder (for example, under /anaconda3/Lib), from where you can import it directly into your code.
# Twitter Consumer API keys
CONSUMER_KEY    = "api123"
CONSUMER_SECRET = "api123"

# Twitter Access token & access token secret
ACCESS_TOKEN    = "api123"
ACCESS_SECRET   = "api123"

BEARER_TOKEN = "api123"

class TwitterSecrets:
    """Class that holds Twitter Secrets"""

    def __init__(self):
        self.CONSUMER_KEY    = CONSUMER_KEY
        self.CONSUMER_SECRET = CONSUMER_SECRET
        self.ACCESS_TOKEN    = ACCESS_TOKEN
        self.ACCESS_SECRET   = ACCESS_SECRET
        self.BEARER_TOKEN   = BEARER_TOKEN

        # Tests if keys are present
        for key, secret in self.__dict__.items():
            assert secret != "", f"Please provide a valid secret for: {key}"

twitter_secrets = TwitterSecrets()
Once you have imported the file, you can then load the API credentials from the file in the following way:
consumer_key = ts.CONSUMER_KEY
consumer_secret = ts.CONSUMER_SECRET
access_token = ts.ACCESS_TOKEN
access_secret = ts.ACCESS_SECRET

### Print API Auth Data (leave disabled for security reasons)
# print(f'consumer_key: {consumer_key}')
# print(f'consumer_secret: {consumer_secret}')
# print(f'access_token: {access_token}')
# print(f'access_secret: {access_token}')

#authenticating to access the twitter API
auth=tweepy.OAuthHandler(consumer_key,consumer_secret)
auth.set_access_token(access_token,access_secret)
api=tweepy.API(auth)

def send_pricechange_tweet(signal):
    api.update_status(f"{signal} \n {relataly_url}")
Step #5 Starting the Crypto Signal Bot
Finally, we can hit the start button of our crypto signal bot. But before we do this, take a look at some configuration options of the bot.
- CYCLE_DELAY is the standard interval in seconds in which the bot will call the gate.io API.
- CURRENCY_PAIR is another API parameter limiting the cryptocurrency pairs to specific currency pairs. The bot will scan the entire market with all currency pairs in the standard setting, including all USDT pairs.
- TWITTER_ACTIVE defines whether the bot posts signals on Twitter. Be aware that your bot may instantly report any signal on your Twitter account if you enable it.
- RUNS defines the max number of prices that the bot will retrieve before the bot stops.
Now, let’s test the bot:
RUNS = 50 # the bot will stop after 50 price points
CYCLE_DELAY = 20 # the interval for checking the data and retrieving another price point
EVAL_PRICES_DELAY = 10
CURRENCY_PAIR = "" # the bot will retrieve data for all currency pairs listed on gate.io
PRICES_CONFIG = {"price_update_delay": 20}
TWITTER_ACTIVE = False

CHECK_SIGNAL_CONFIG = {
    "moving_avg_threshold_down_p": 0.10,
    "moving_avg_threshold_up_p": 0.10,
    "delta_threshold_p": 0.07,
    'enable_twitter': TWITTER_ACTIVE,
}

if __name__ == "__main__":
    logging.basicConfig(
        level=logging.INFO, format="\033[02m%(asctime)s %(levelname)s: %(message)s"
    )
    logger = logging.getLogger(__name__)
    prices = Prices(PRICES_CONFIG)
    prices.start_cont_update()
    currency_dfs = {}
    logging.info(f"Crypto bot is starting - please wait")
    logger.info(f"Collecting crypto data from gate.io for {EVAL_PRICES_DELAY}s")
    time.sleep(EVAL_PRICES_DELAY)
    logger.info(f"\n<< Crypto signal bot started :-) >>")
    logger.info(f"<< Checking prices every {CYCLE_DELAY} seconds >>")
    logger.info(f"Now checking for signals - please wait\n")
    for i in range(RUNS):
        price_history, lock = prices.get_price_history()
        lock.acquire()
        indicators = calc_indicators(price_history)
        lock.release()
        for currency in indicators.keys():
            if not indicators[currency]:
                continue
            signal = check_signal(
                currency,
                indicators,
                CHECK_SIGNAL_CONFIG,
            )
            if signal:
                logger.info(signal)
                if CHECK_SIGNAL_CONFIG['enable_twitter']:
                    send_pricechange_tweet(signal)
                    print('send via twitter')
        time.sleep(CYCLE_DELAY)
2022-03-09 11:40:38,939 INFO: Started continuous price logging
2022-03-09 11:40:38,940 INFO: Crypto bot is starting - please wait
2022-03-09 11:40:38,940 INFO: Collecting crypto data from gate.io for 10s
2022-03-09 11:40:48,941 INFO:
<< Crypto signal bot started :-) >>
2022-03-09 11:40:48,942 INFO: << Checking prices every 20 seconds >>
2022-03-09 11:40:48,942 INFO: Now checking for signals - please wait
2022-03-09 11:52:06,800 INFO: EOSBULL_USDT up + 19.42446% MA:$1.1e-05 last_price:$1.4e-05 price delta:3e-06 volume:$1272326905.1 daily_change:33.65% high_24h:$1.16e-05 low_24h:$9.8e-06low_high_diff_p:18.37%
EOSBULL_USDT new 24h high $1.39e-05
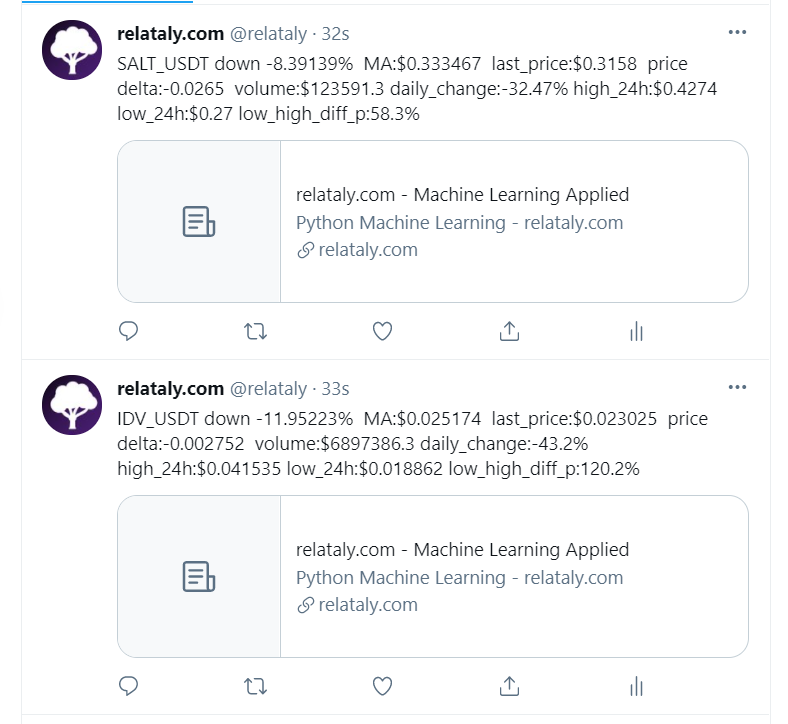
send via twitterAnd this is what the tweets will look like on Twitter:
Summary
Congratulations on completing this tutorial! In this article, you learned how to build a Python-based Twitter crypto signal bot. When run, the bot will regularly retrieve cryptocurrency quotes from the Gate.io exchange and tweet about any price movements based on a simple signaling logic.
While the signaling logic in this tutorial is kept simple, this basic framework provides a foundation for you to further develop and enhance the signaling rules. For example, you could consider using volume or price volatility changes as the basis for defining signals. Have fun experimenting and expanding upon this project!
If you found this article helpful, please show your appreciation by leaving a comment. Cheers
Sources and Further Reading
- Charu C. Aggarwal (2018) Neural Networks and Deep Learning
- Jansen (2020) Machine Learning for Algorithmic Trading: Predictive models to extract signals from market and alternative data for systematic trading strategies with Python
- Aurélien Géron (2019) Hands-On Machine Learning with Scikit-Learn, Keras, and TensorFlow: Concepts, Tools, and Techniques to Build Intelligent Systems
- David Forsyth (2019) Applied Machine Learning Springer
- Andriy Burkov (2020) Machine Learning Engineering
The links above to Amazon are affiliate links. By buying through these links, you support the Relataly.com blog and help to cover the hosting costs. Using the links does not affect the price.


1 Commentarchived from the original site